


My obsession with Pressed Flowers
...and how to make a pressed flower greeting card-a gift from the garden.


When I started the flower farm, I had no idea the amount of new hobbies it would bring into my life. My intention was to grow flowers and sell them. The thought of preserving them for future use never crossed my mind. I now find creating with flowers that have been dried or pressed as rewarding and satisfying as creating with flowers when they are fresh. The ability to hold on to their beauty for an extended amount of time appeals to me. As does learning new techniques to show off this beauty. I find it thrilling.
Lisa, my colleague and a best friend, shares my enthusiasm. She is my safe place when I want to talk about the weird and wacky ideas I have. I show her all my creations first. She is the most amazing creative genius when it comes to dried flower art, which she never gives herself credit for. So when she started pressing flowers, I wasn’t far behind.
We both took great delight reading “The Modern Flower Press” by the lovely ladies from Jam Jar Flowers, which is as much about the origins of flowers as it is about pressing and creating with them. It ignited in us a little fire to press the flowers we grow, arranging them in pleasing ways. We have had successes. We have had failures. We have learned what looks simple is actually quite difficult.
This is an “Arrange” post that should be bookmarked for the future, after you have some pressed flowers to work with. By seeing what is involved in mastering this simple project, it will give you time to press the appropriate flowers to complete it. There are lots of wonderful things to be pressed now if you start looking. Snowdrops pressed carefully would be stunning. Soon the crocuses will be out as well as the Spanish blue bells. All of these would flatten beautifully. Later in the year there will be a post dedicated to pressing flowers, but for now, let’s talk about what to do with them.
Today we are going to make a pressed flower greeting card. A card to give to someone special that they can keep and enjoy and marvel at the real flower placed lovingly on the cover. You will need…
a blank greeting card
1-5 pressed flowers
glue-I use Mod Podge which is great for paper crafts
2 clean sheets of paper
small paint brush
small bowl
I do this craft on my wooden dining room table. I don’t bother covering it with a tablecloth, but if you are precious about your table and want to avoid sticky glue touching it, you might want to lay something over it that glue won’t ruin.
The first thing I do is lay my card on the table and decide on the composition of my card. Am I using one flower or lots of flowers? Will I include leaves or leave the stems bare? One of the most useful things I learned from The Modern Flower Press was you can cheat when creating your piece. Your pressed flower might not have lots of leaves or it might lose a petal along the way, but there is no reason why you can’t reintroduce them when creating your art. So try and think a little outside the box when composing your card.
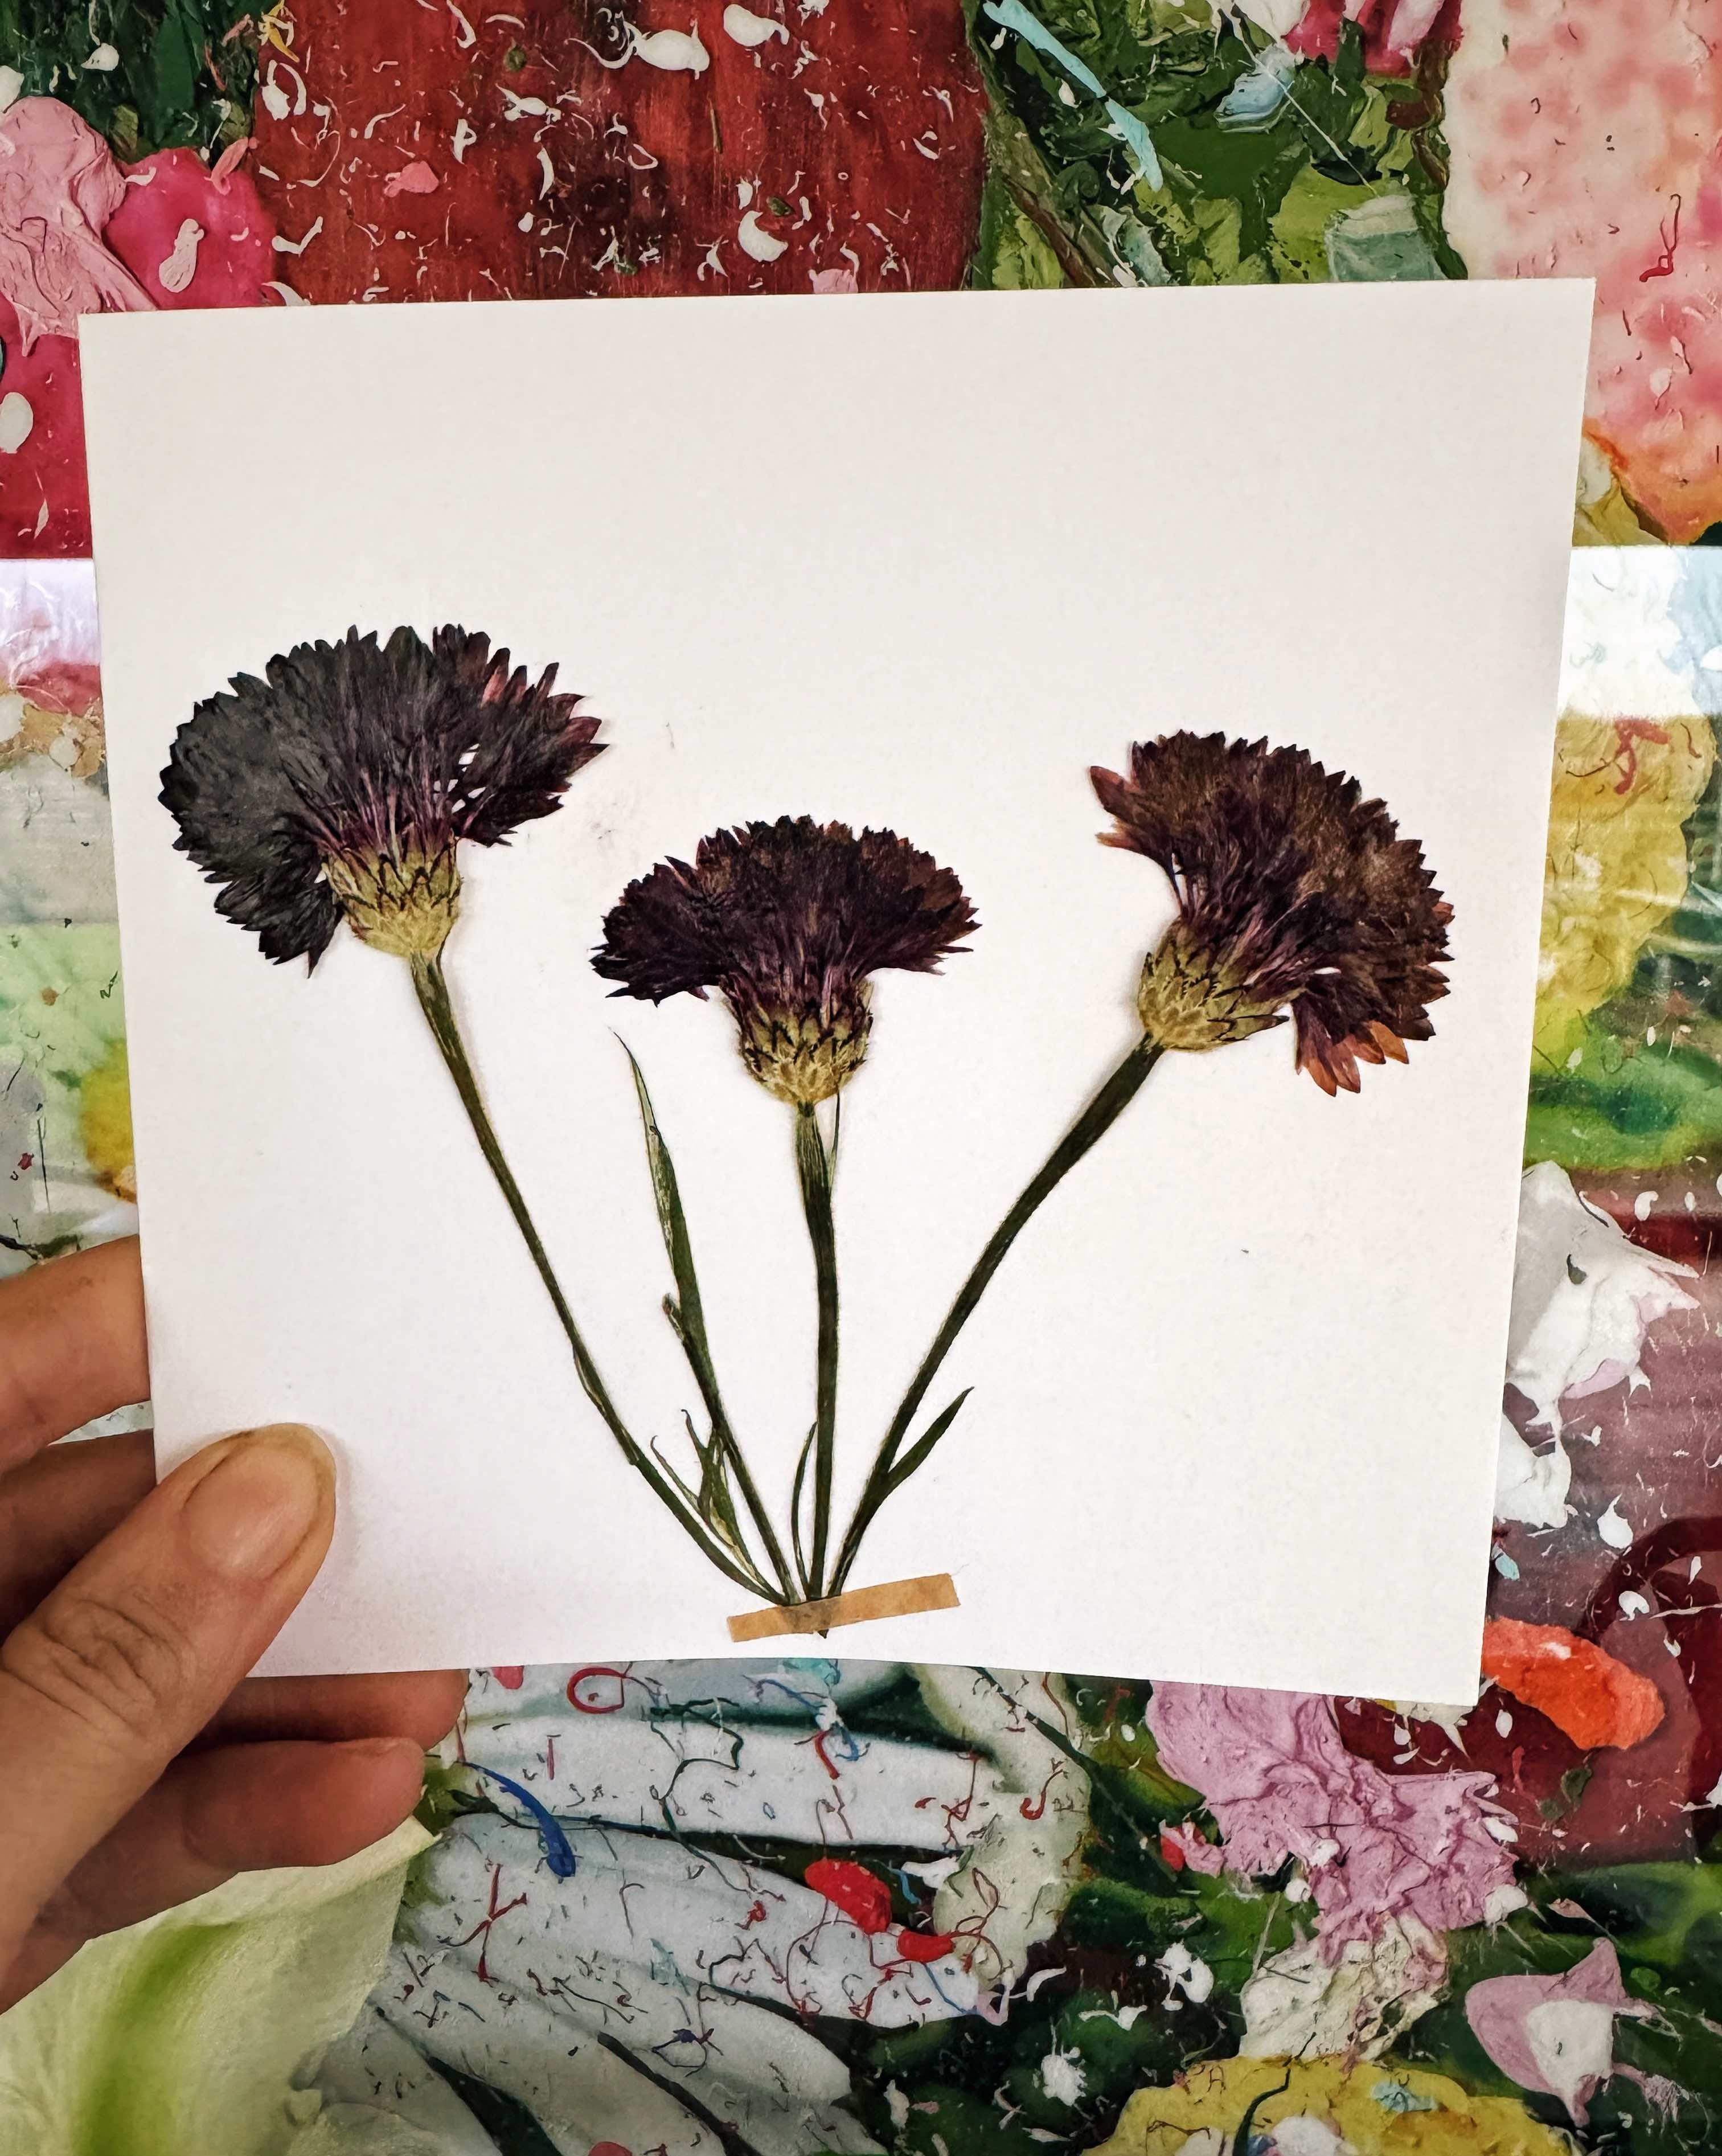
For example, look at the photo below. The cornflowers are much too long for the card. However, I really love the small detail of the leaves at the bottom of the stem. You will see in my final design they are magically there. I simply cut the middle section of the stem out and re-glued it so it looks like they grew that way. This way I get to keep the best bits of the flower, and not sacrifice anything I love. When I am trimming my stems, I could use a pair of small, sharp scissors, but more often than not, I just pinch the stems with my fingernails.
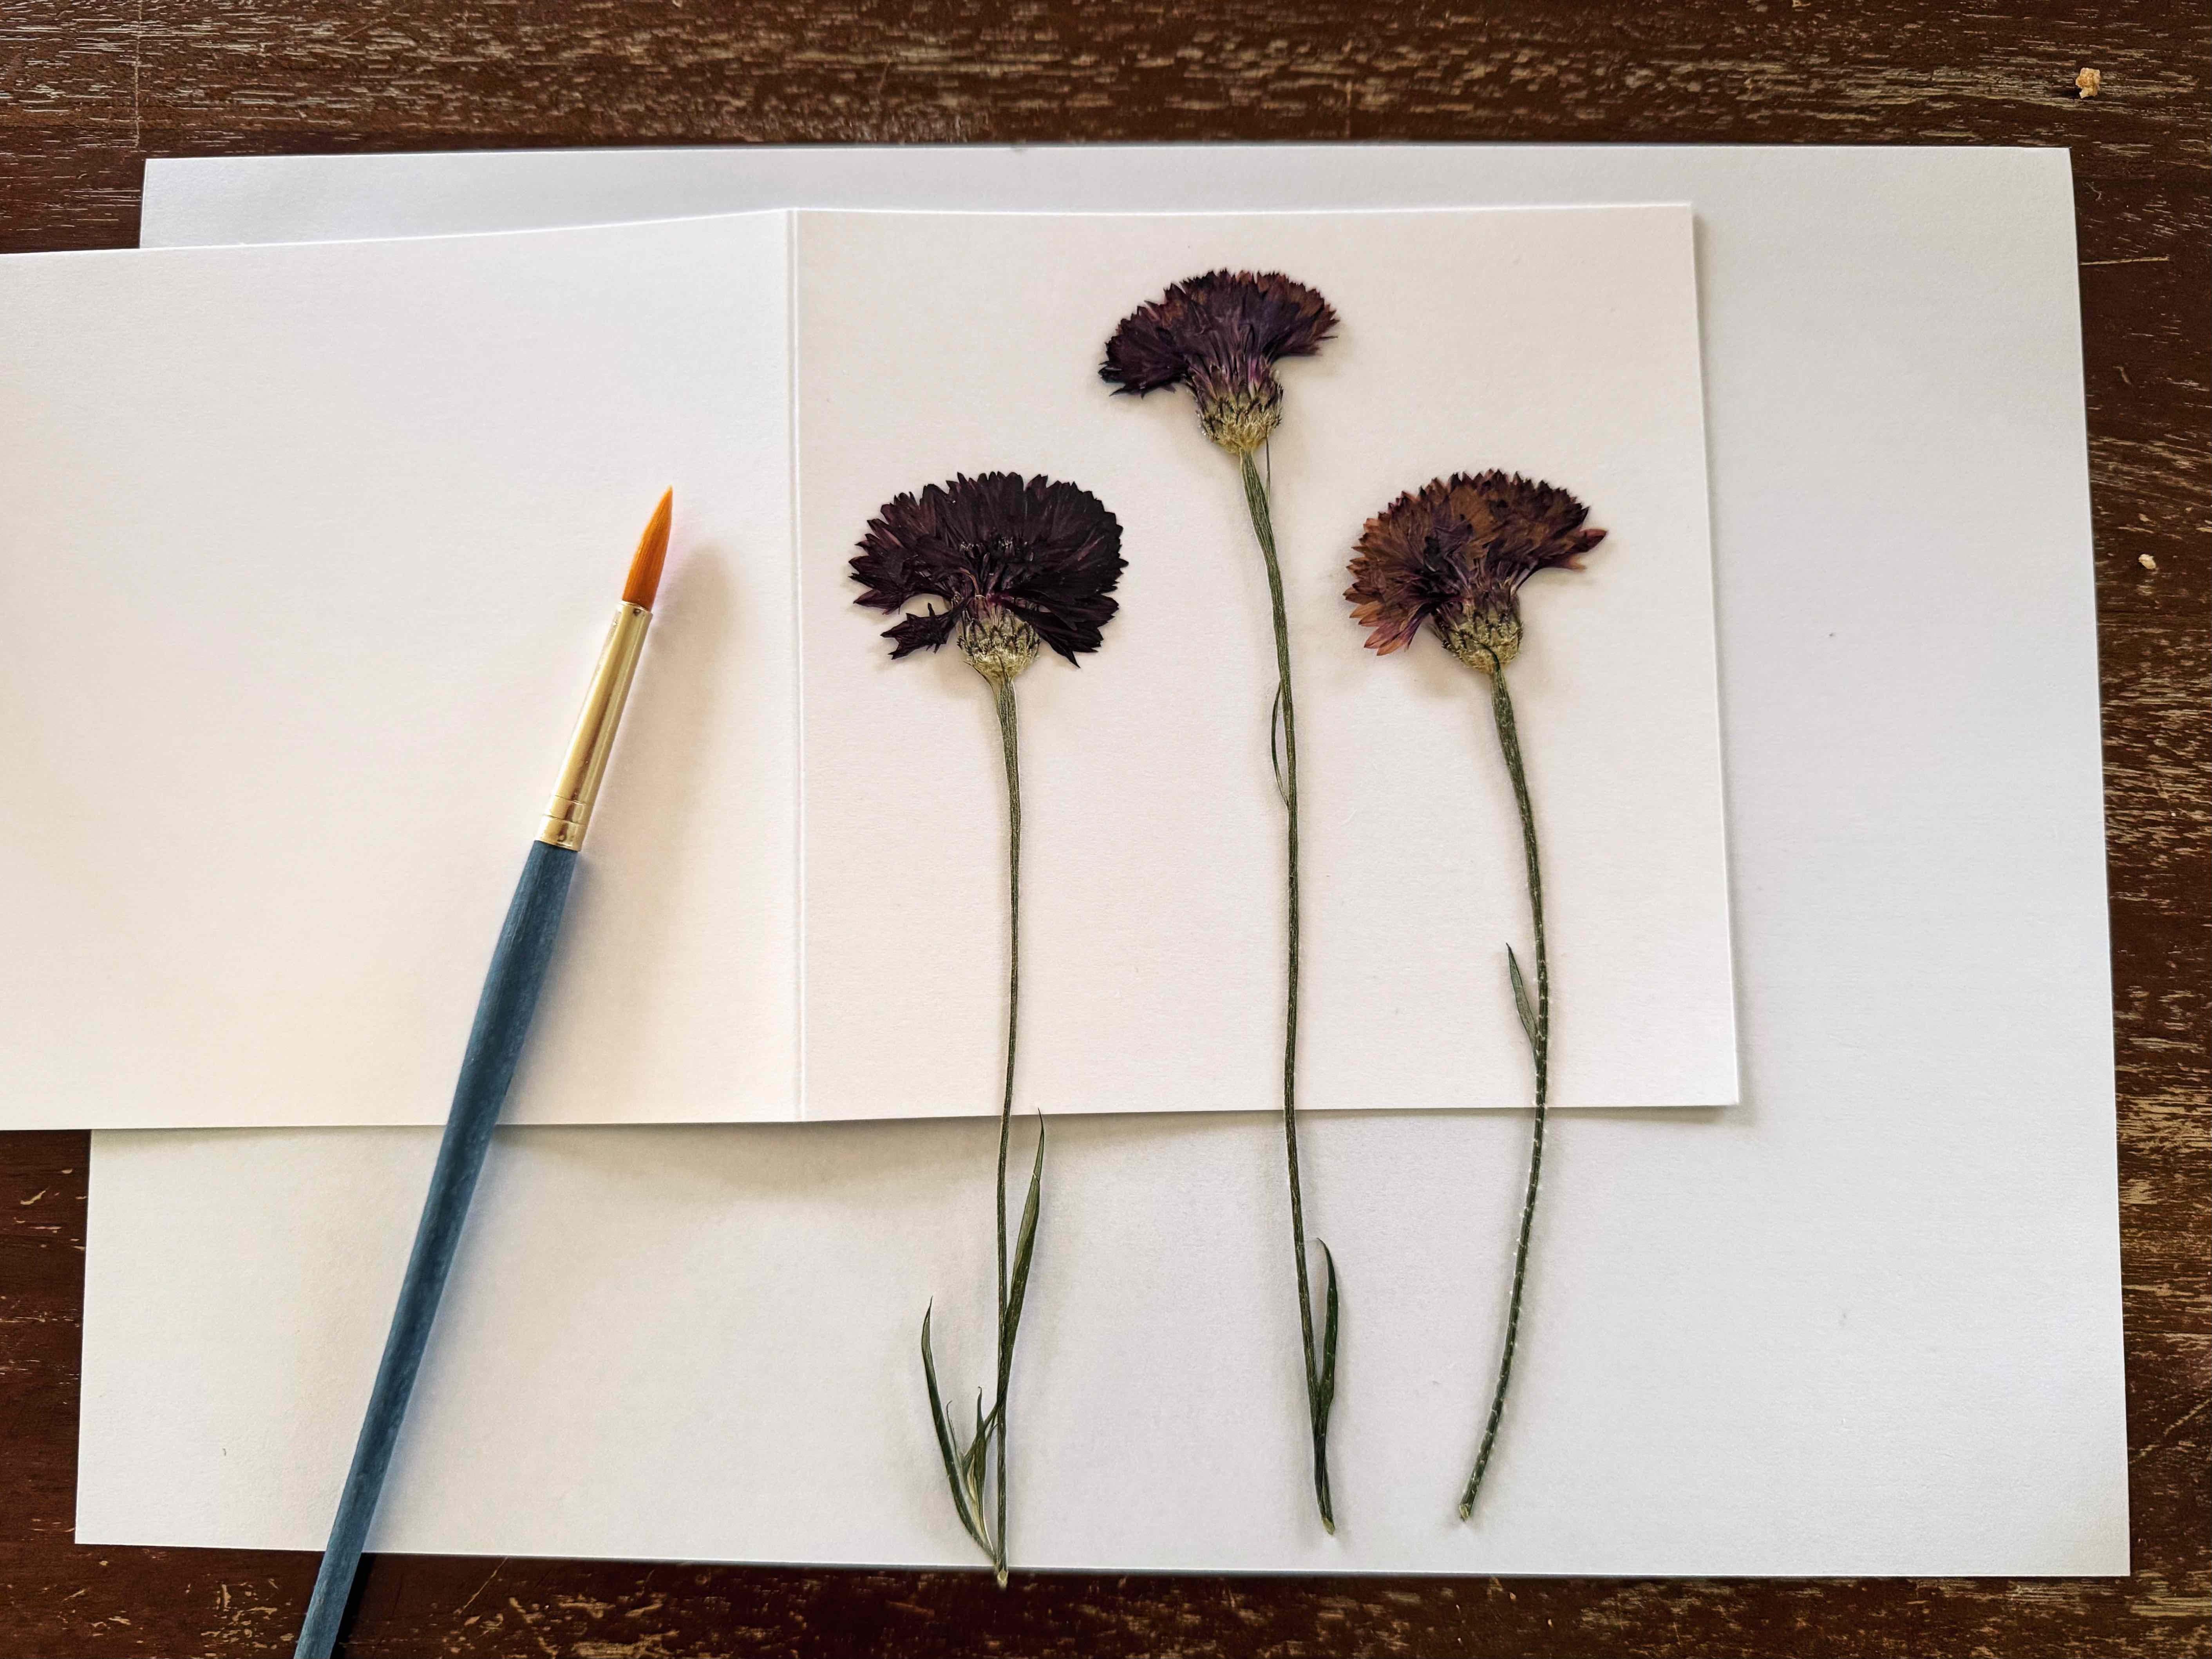
Sometimes you will need to manipulate the flowers a bit to get just the composition you want, but a lot of times you will have pressed a single flower to perfection and won’t need to do anything. One simple bloom will be enough to make a beautiful card. It can be as simple, or complicated, as you like. Pressing a whole pansy-leaves and all- is a wonderful way to get a flower just the right size for your card, requiring no additional faffing. A single cornflower would have worked well here. I am just greedy.
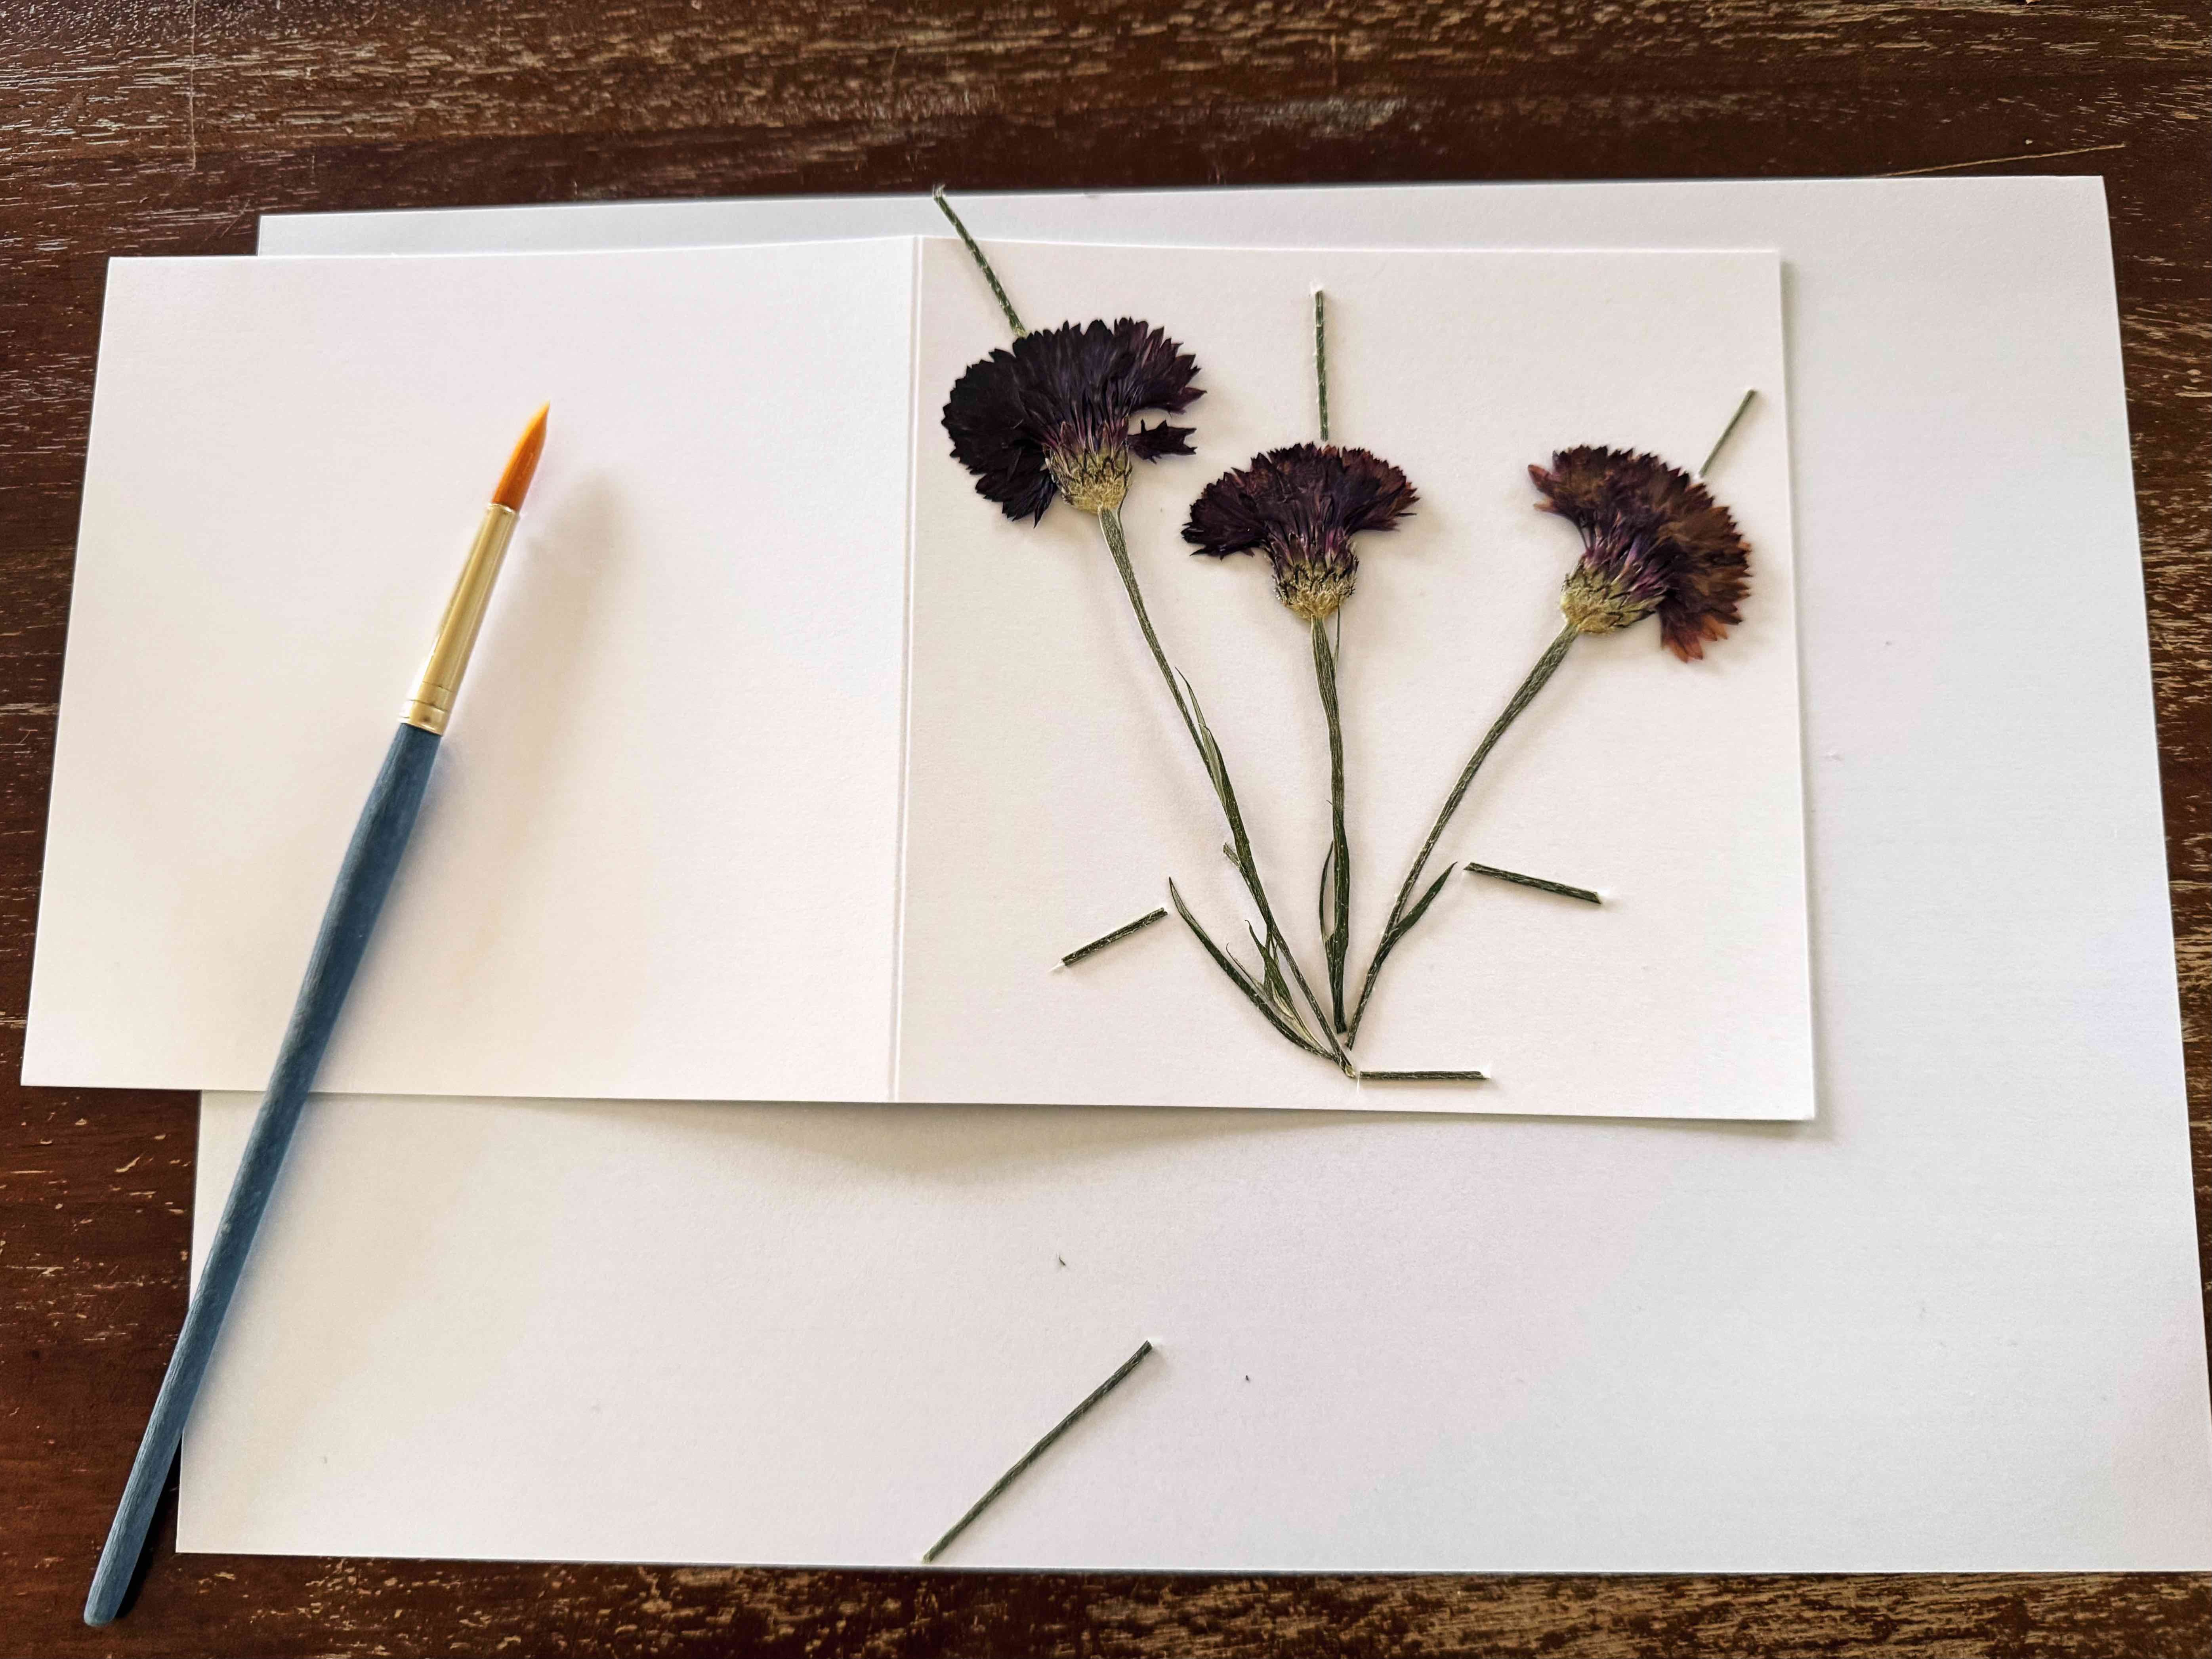
Once you have decided on your composition you need to make notes on where you placed the flowers. As you can see in the photo, I have used little bits of unwanted stem to mark where the flowers should be returned once I remove them and added glue to their back side. I have also taken a photo of the composition to remind myself where everything goes. I never manage to get it exactly right, but this is where the fun lies. Mother Nature still seems to be calling the shots, letting the flowers do what they want long after they have left the garden.
Now comes the fun part-glue! You will want to pour a little glue into a little pot to dip your brush in. I neglected this step when taking the photos for this project and I regretted it immediately. Glue all over my paintbrush. What a mess. Carefully lift your chosen flower off its placement on the card, and place on the clean sheet of paper. Starting in the middle of the bloom, gently brush from the centre out, covering the petals in glue. Repeat until the whole flower is covered, then move down the stem and cover the leaves. You will want to move swiftly, being very very gentle all the while.
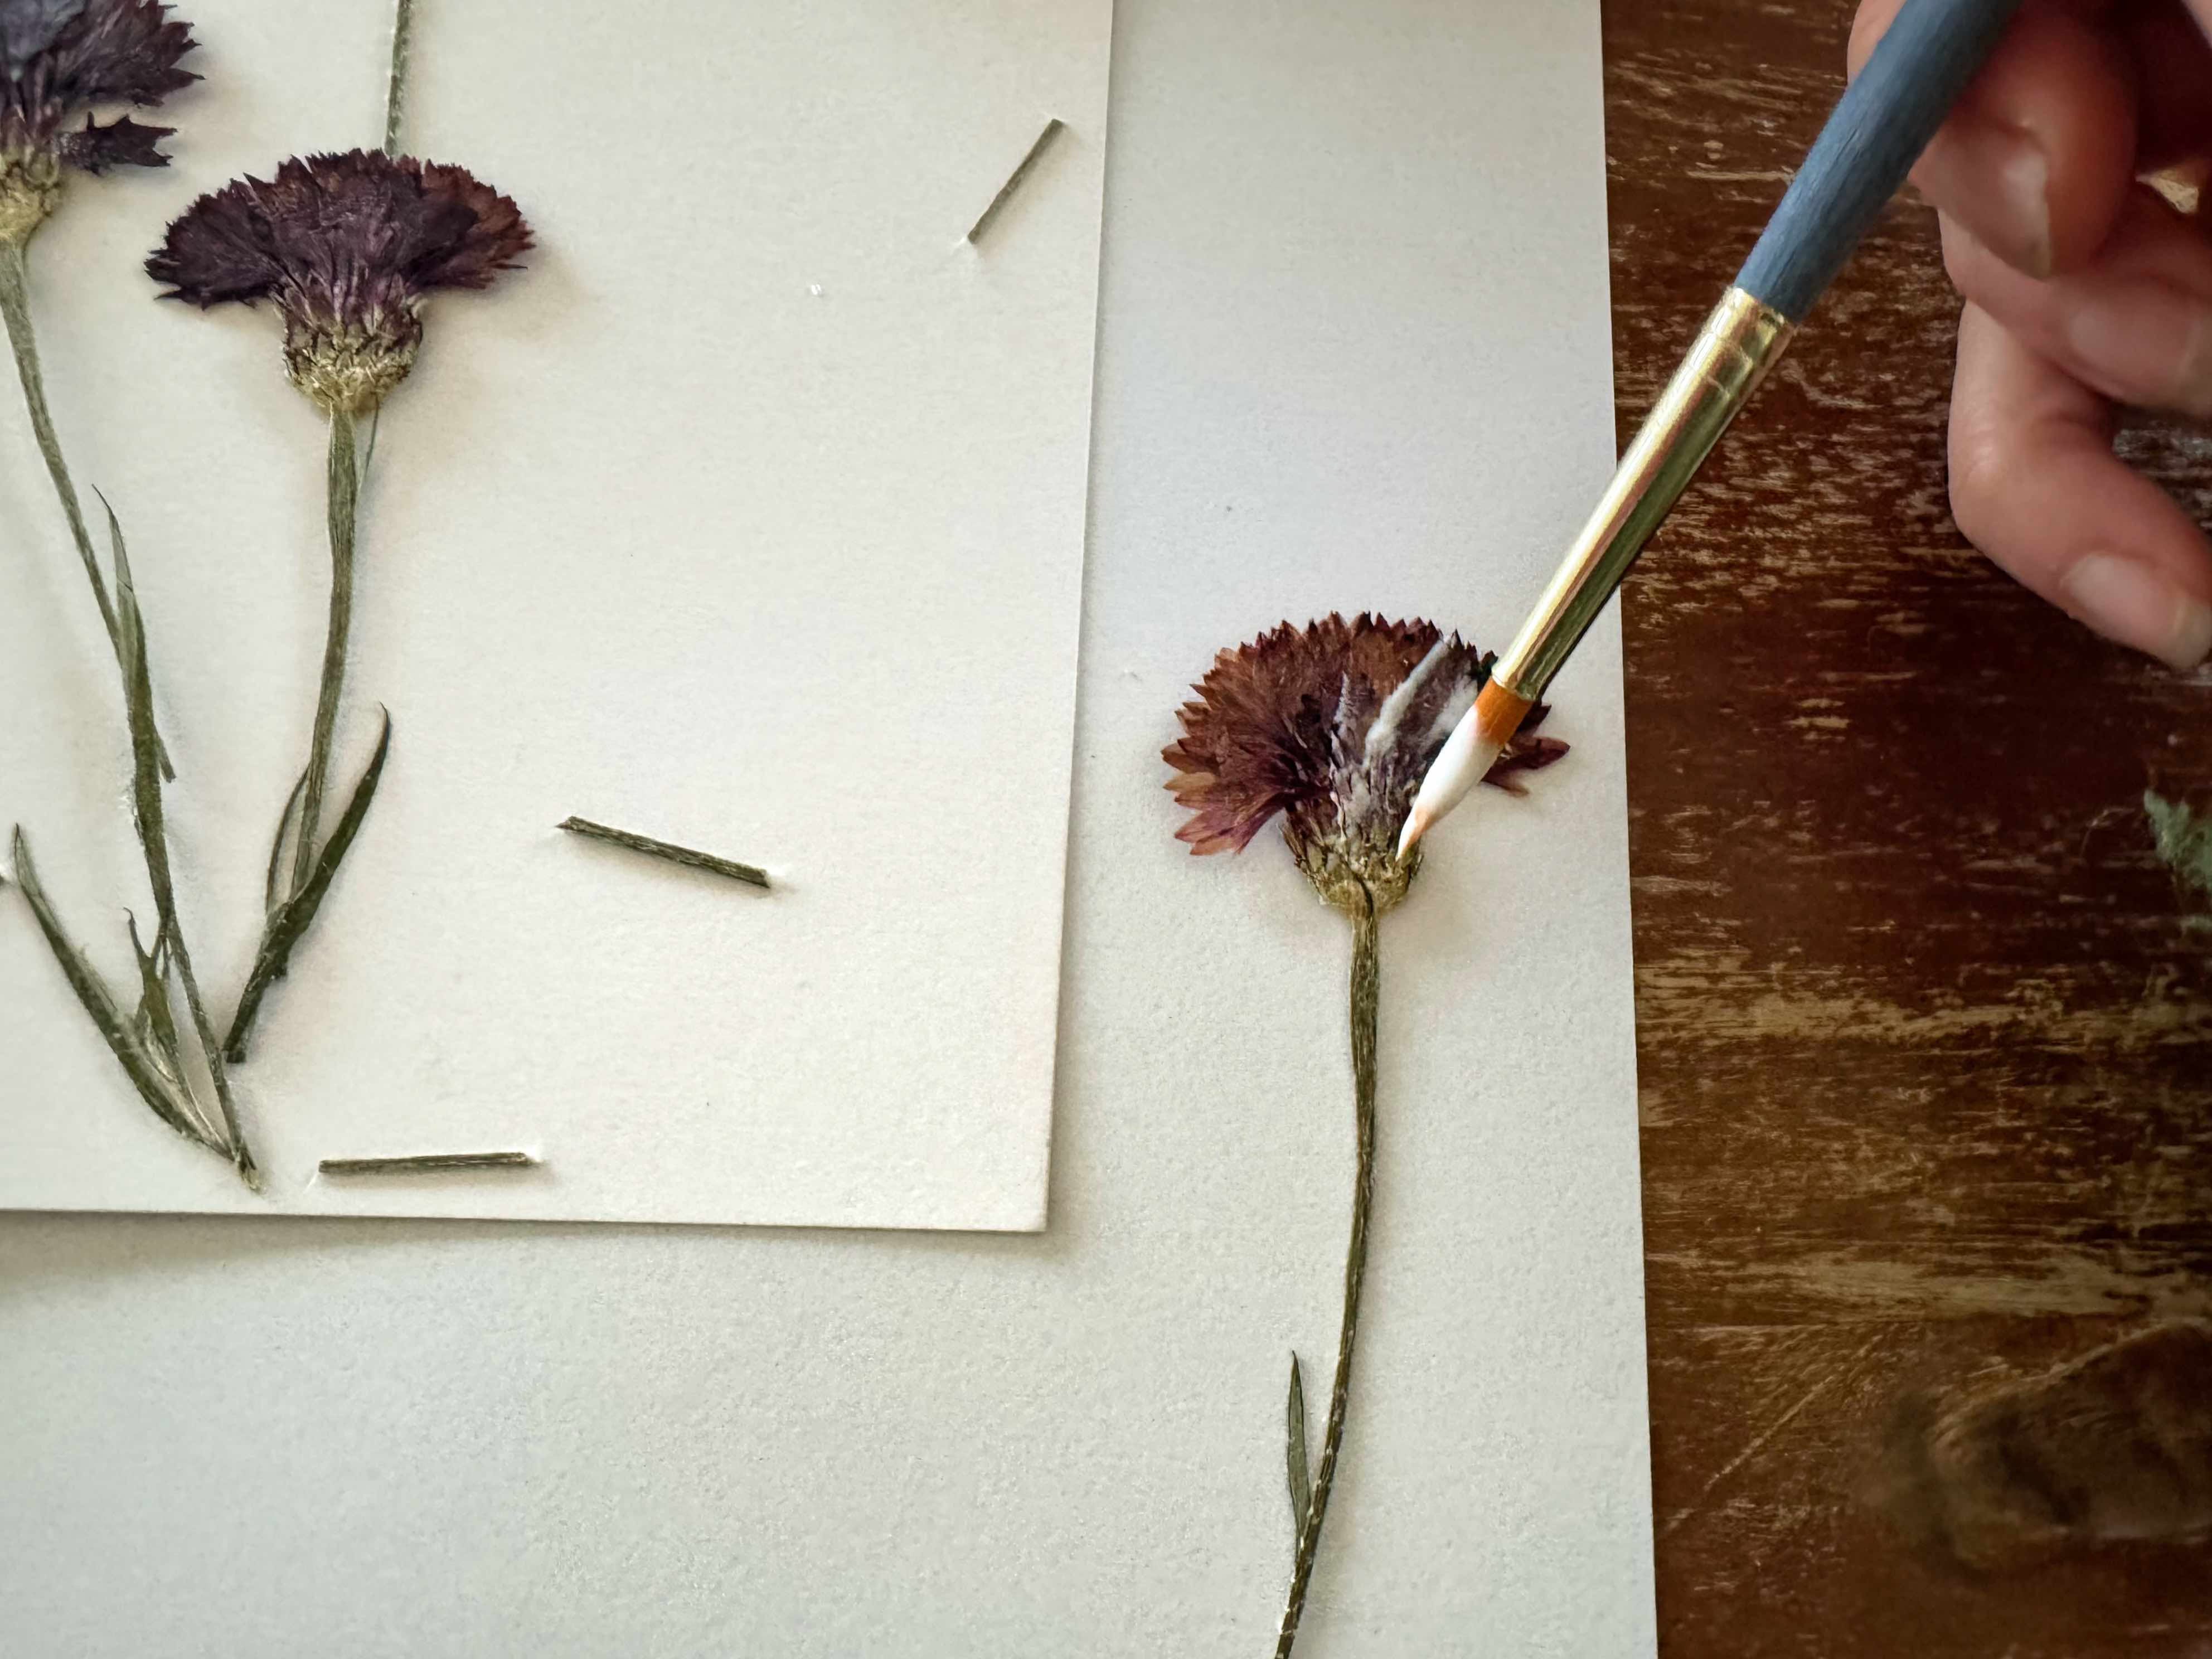
You now need to transfer your flower covered in glue onto your paper card. Use your markers to guide you. Once your petals hit the paper, they are pretty stuck, so you want to get this bit right first time. Don’t worry if they don’t land exactly where you want them, and try to avoid moving them once they have stuck to the paper. Once the petals are in place, gently press the stems onto the paper as well.
Once your flower is attached, take a clean sheet of paper and lay it over your card, covering your flower. Gentle press on the paper for several seconds. This will ensure the flower is firmly stuck on the card. If your stems pop up off the paper a little, apply pressure again. Repeat these steps for any additional flowers you need to add.
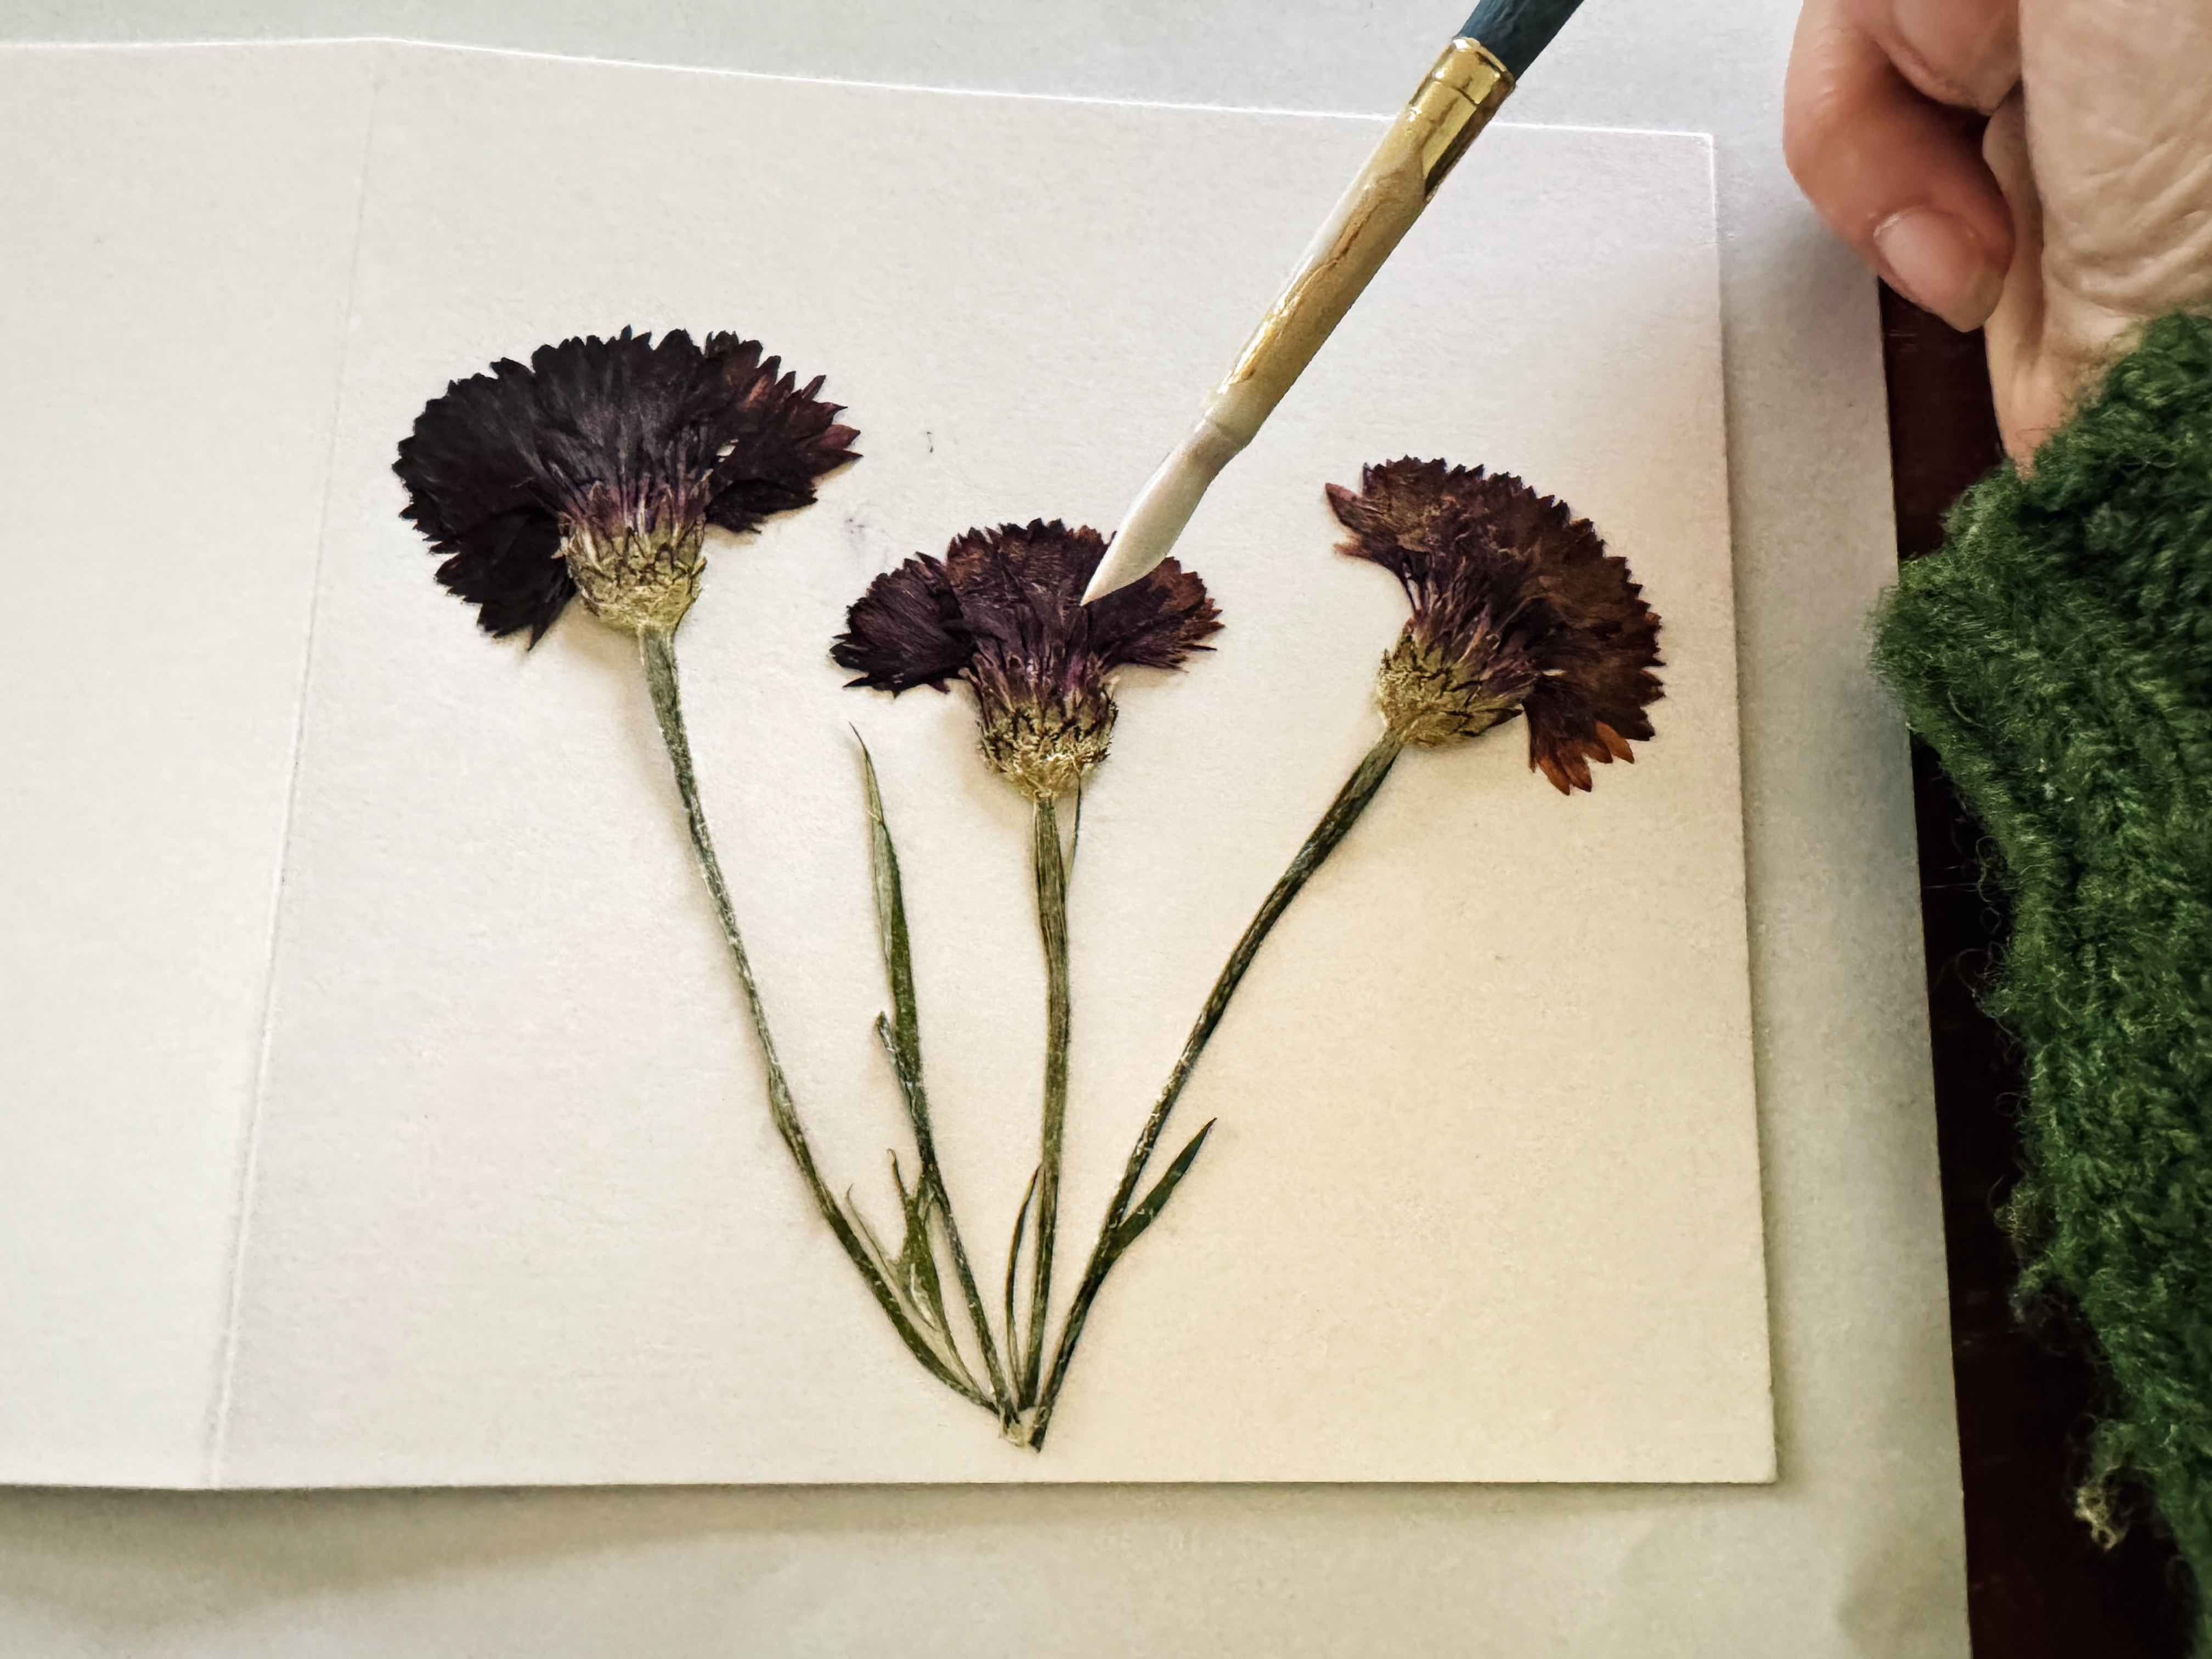
To complete your card you will want to create a seal over your pressed flowers. This isn’t 100% necessary but as the glue dries clear, I sometimes like to give the flowers this extra coat for protection. As before, cover the tip of your brush in glue, and starting in the centre, gentle cover the flower in a thin top coat. You want to avoid seeing any white glue blobs and make your top coat as thin and even as possible.
Your glue will be touch dry within 30 minutes (usually a lot sooner) but leave your card to set properly for 24 hours before giving to a loved one. You might want to add a finishing touch, such as handwriting the name of the flower onto the card, and when it was grown, or perhaps adding “made by” on the back.
I would love to hear and see how you get on with this project so if you do attempt it please drop a comment and let me know. I am still staring at my card, amazed by the texture and colours of the flowers. I would be thrilled if someone gave this to me. A spark joy moment for sure.
I will be taking next week off from writing as the children will be off for half term. The following week will be a GROW post. Soon it will be time to start sowing seeds in earnest!
What is the brown tape called please?